1 - Webservice
Create a Webservice key and forward it to Yourviews.
For these, follow the steps:
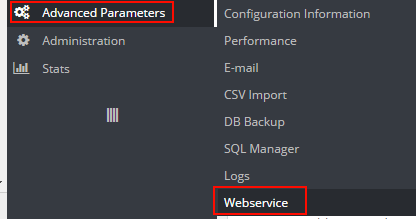
a) In Prestahop admin panel, go to Advanced Parameters > Webservice

b) Hit "Add new webservice key"
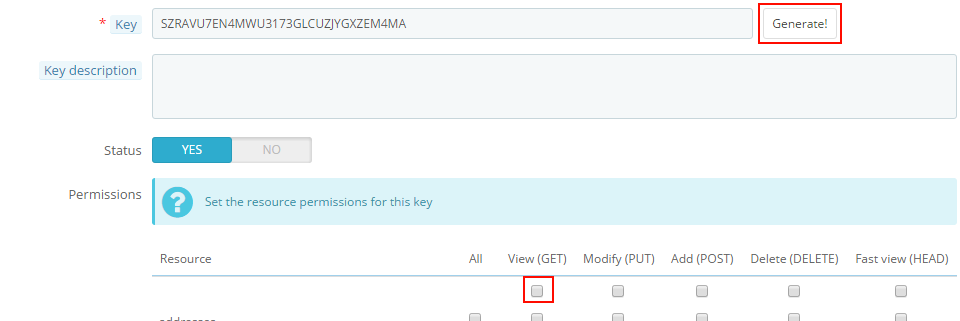
c) In the following screen, click 'Generate' to create a Key and give de 'View (GET)' permission for every item

d) Click save and give the generate Key to Yourviews.
Important: Confirm the webservice is properly enabled (Enable Prestashop's webservice)
2 - Frontend Setup
We have to add the following Javascript in the footer of all pages:
<script type="text/javascript">
(function () {
var yvs = document.createElement("script");
yvs.type = "text/javascript";
yvs.async = true;
yvs.id = "_yvsrc";
yvs.src = "//service.yourviews.com.br/script/STORE_CODE/yvapi.js";
var yvs_script = document.getElementsByTagName("script")[0];
yvs_script.parentNode.insertBefore(yvs, yvs_script);
})();
</script>
Important: Change the STORE_CODE for the code given to you by Yourviews staff.
3 - Create Write Review landing page
Create a new page in your store CMS which will be used to write reviews.
For that:
a) Go to Preferences > CMS.
b) Click Add new CMS page.
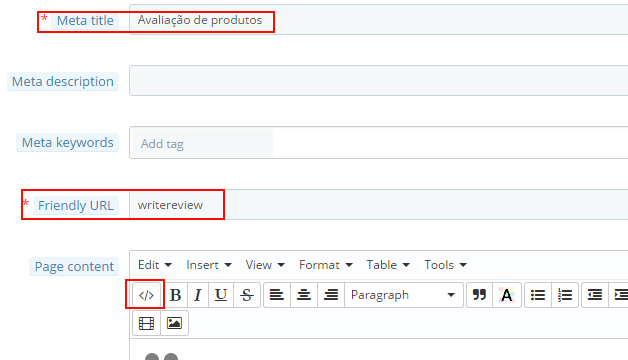
c) In "Meta title" write "Product Reviews"
d) In Friendly URL, use "writereview"
*e)*In Page Content > Source Code, add the following code
f) Check Indexation by search engine and Displayed as "Yes"
<div id="yv-show-form" style="min-height:300px; background-image:url(https://service.yourviews.com.br/static/images/loading.gif);background-repeat:no-repeat">
<br/><br/>Please wait...<span class="fr-marker" data-id="0" data-type="false" style="display: none; line-height: 0;"></span><span class="fr-marker" data-id="0" data-type="true" style="display: none; line-height: 0;"></span>
</div>
g) Save the page
